Lighting for video in Home Close Hole.
Chris Batstone
The idea for making a video of the digging activities HCH grew out of the initial short video I made, "The First Buckets". Being shot entirely on the surface, lighting did not present a big problem. This video was shot using a Sony HD Handycam.
When making the decision to try and make an underground video, it was clear that using the Sony would mean a waterproof housing and some quite powerful lighting equipment. Waterproof housings are expensive as are powerful lights which require big expensive batteries and manpower to shift it all about.
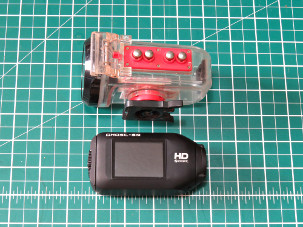
I had in my arsenal a small compact Contour HD action camera with a housing which seemed ideal for the job. Having helmet mounted the camera along with two Tesco brand LED torches, I made my first experimental attempt. The main drawback to using this method of filming in the confines of HCH soon became apparent.
- You obtain lots of close-up footage of walls, floor, ceiling and hands.
- LED torches give a very concentrated beam and tend to over expose at close range. (And produce a small circle of usable light at distance).
I purchased a 5W LED cap lamp on E-Bay for about £30.00, which I thought may be adaptable for video work with a diffuser. The problem with this is twofold;
- A diffuser reduces the light output dramatically. (Inverse square law of light).
- The design of the LED reflector gives a somewhat tubular beam, so that when a diffuser is used it tends to create a dark spot in the centre of the light field.
Using a helmet mounted camera was not giving the desired results. The constricted nature of the passageways and the inadequate lighting dictated a more conventional approach to the problem. The Contour HD camera was not really the best performer in low light situations. I decided to purchase a Drift Ghost-S 1080p camera. This little camera has a low light setting and has performed very well so far. I normally use it in its waterproof housing just to keep the Home Close mud at bay. The manufacturer claims the camera itself is waterproof to -3m.
The built in screen makes it relatively easy to change camera settings and enables playback without having to connect to a pc. Detailed specs can be had from; http://driftinnovation.com.
Video Light Mk 1
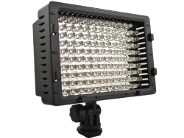
Lighting the scene was addressed by purchasing two Neewer CN-160 LED video lights. They cost about £25.00 E-Bay or Amazon. These units are powered by either 6 AA cells or can be optionally run on camcorder batteries. A rotating on/off switch controls the brightness. With a runtime of approx 60 minutes, the 160 LEDs give a nice even light with a coverage suitable for 1080p video.
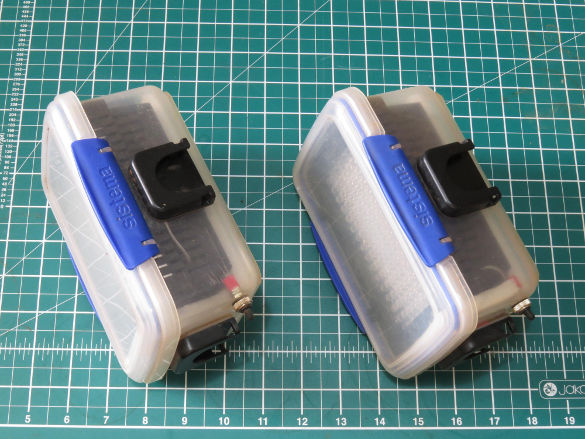
As they come they are certainly not Home Close proof. Especially when mud and water are coming from all directions This was solved by a visit to the local Wilco store purchasing a pair of 1 litre Sistema clip lock food storage containers. Having removed the hot shoe bracket, light unit fits quite snugly into the food container. With a bit of the foam packing from the original box to stop the unit from rattling about pop on the lid - an instant waterproof housing. One small problem then remains. Turning it on and off, as it would be necessary to open and close the case to operate the rotating switch. A pair of sub miniature toggle switches with waterproof covers from Maplin, soon sorted that problem.
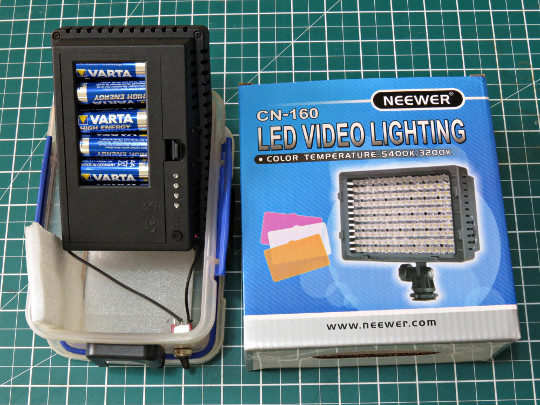
Disassemble the light unit to gain access to the switch wiring from the +ve battery terminal to the switch. Break this wire and extend it out of the unit through one of vents and solder the wires to the switch terminals. Reassemble the unit. Drill a suitable sized hole to take the sub miniature switch. (The hole needs to be sited so that the unit will not foul on the switch body).
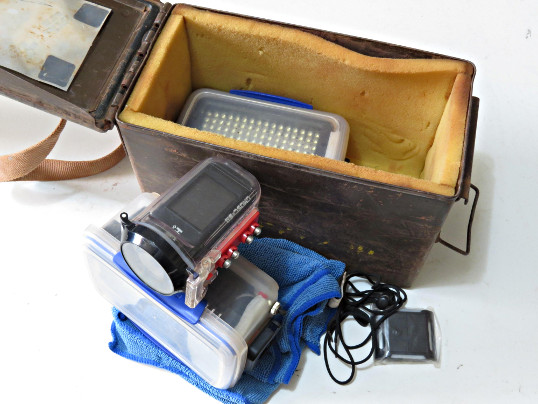
With the toggle switch turned off the rotating switch can be turned on and the lamp re-sited and the container closed. The lamp can now be turned on and off without opening the container, by means of the toggle switch. By adding two self adhesive helmet mounts, the camera can be attached to the lamp for ease of use.

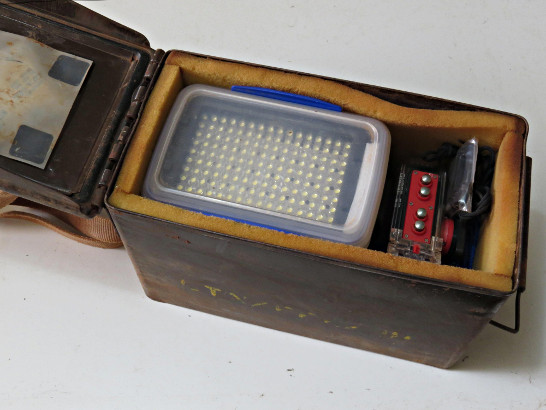
Both Units and camera fit nicely into an ammo box
The 30watt Super Lamp Mk Ia.
I decided I needed something that would give a bit more light partly for use in the quarries around Bath. I obtained a cheap 10 watt LED flood light. These floodlights are designed to run a 24-35v 10W LED chip via a driver unit running off 230v a.c. mains.
Having removed the mains driver unit a suitable d.c. power source was needed. Two 12v 4Ah sealed lead acid batteries connected in series were used to provide a 24v supply to the original LED chip. This proved to be a bit of a disappointment in terms of light output. It soon became obvious that this chip needed to be driven at its 35v fwd voltage to give any usable illumination.
Ideally what was required was a 10w LED chip running at around 12v. A search on the internet found 10W White High Power 900-1000LM LED SMD Chip 9 - 11v d.c. I calculated that running three of these chips in parallel would give a vastly improved performance.
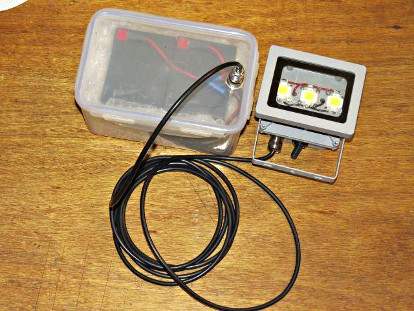
The lamp unit was dismantled and the "reflector" removed. Holes were drilled to take the self tapping screws to mount two extra chips. The body of the floodlight was aluminium and designed as a heat sink so heat dispersal was not a problem; a dab of thermal paste was applied to the back of each chip prior to mounting it. The chips were wired back through a 1.00 ohm resistor and waterproof toggle switch mounted in the rear housing. A 3m cable provided the power from two 4Ah 12v batteries connected in parallel, housed in a clip-lock food container.
The Super Light with SLA battery pack.
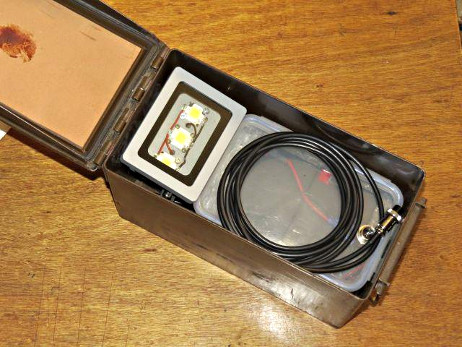
The lamp and battery unit packed into an ammo can
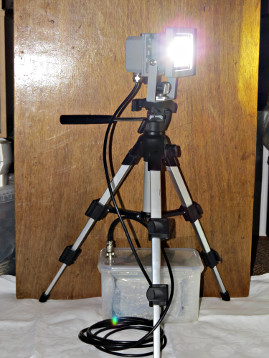
Tripod mounted to give a stable light source
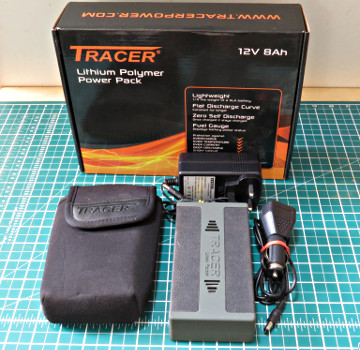
The major problem with this setup was that although battery and lighting unit fitted neatly into the ammo can, the SLA batteries were heavy and there was no space left for the camera. A lithium polymer battery would be the ideal solution. There are many Li-Po batteries out there, and having scoured the likes of E-Bay and Amazon I soon realised that many of the cheap Chinese origin batteries were "not quite the ticket."
The 30 watt Super Lamp Mk 2.
I needed a robust and lightweight power pack and eventually found Tracer Power. (http://www.tracerpower.co.uk). The 12v 8Ah pack was ideal. Dimensions 152 x 80 x 38 mm, the unit comes with chargers for mains and vehicle and a nice neoprene carrying case.
The power lead to the lamp was shortened from 3m to 1.5m for filming in HCH where too many loose coils were a hindrance in the constricted parts of the cave.
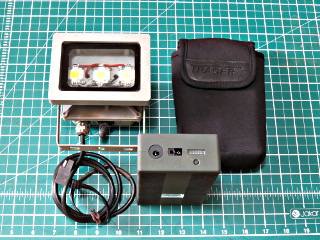
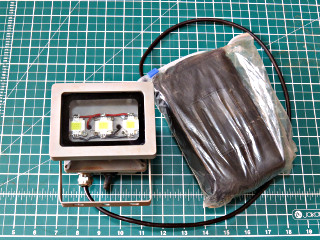
With the battery pack in its protective neoprene case a plastic zip up freezer bag was added for extra protection from the Home Close gloop. The whole thing fits into an ammo can with plenty of room for the camera and a few bits and pieces.
So far this set up has proved quite satisfactory, the 8Ah power pack provided well over 30 minutes of lighting power, while recording Tony drilling at the end of the tube. The pack had only lost about 40% of its charge when checked afterwards.
Video recording in Home Close has been a trial and error process, sometimes more error than trial. Dropping the Mk1 light down a pitch shattered a corner of the Sistema box. Fortunately the light unit survived intact and undamaged. While videoing hauling on Annieversary I forgot to set the camera lens orientation and ended up with an inverted picture. I later managed to correct this in editing so nothing was lost.
Getting the correct white balance can be problematic as the colour temperature of the different LEDs tends to vary. The inclusion in the box of a small white square should get round this problem by videoing a short clip of the white board as a test the footage can then be calibrated during editing.
The main lesson from this is that even in the confines of HCH a lot of light is required. The inverse square law of light cannot be ignored.

Created: Wed Oct 1 18:04:32 2014
Revised: